Tuesday, June 25, 2013

A few of my favorite things...right now

I'm kind of a toiletry/beauty/body product junkie. I could spend hours at Target picking out new body wash, shampoo, etc. Get me in a specialty store, like MAC and I'd spend even longer. 
I love getting special info about products too (I'm a sale's person's dream!)...I'll ask questions, try it out, probably even take it back if it doesn't even perform as promised. ;-)
So I thought I'd share a few of my favorite products...right now. (I say "right now" because I rarely buy the same product twice. I really enjoy trying new things and having something "new" to be excited about. I know, kind of lame, but oh well).

First up is my new body wash! It is St. Ives "Purifying Sea Salt". It's an exofoliating body wash with sea salt and pumice in it. And it smells really good...even after you get out of the shower!
This is perfect for the summer to wash off dirt and chlorine. I love it!


Next is body butter from "bliss". Bliss is a great brand with tons of great products. This particular body butter is lemon+sage...perfect for summer, leaving your skin smelling fresh and clean!
(little hint...Nordstrom Rack sells Bliss products for MUCH cheaper than you can normally find. For example, this body butter is normally $49, but I found it for $12.97!)


My next favorite product is Neutrogena's Pore Refining Toner. Just sweep it over your face after washing and before moisturizing. It really grabs the last bits of dirt and leaves a clean feeling. 


Last, but definitely not least is MAC's...well, I'm not really sure what it's called because the label on the back rubbed off! haha. So...this probably isn't very helpful, but the label on the front says "mineralize skinfinish". I think the color/shade on the back used to say "glow" or something like that. Basically, it works as a highlighter. Sweep it with a big brush on your cheek bones or a little bit on the bridge of your nose.  You can also apply it as a highlighter around the eyes, on the brow bone or in the corner of your eyes. It's fabulous and I've had it for quite awhile...I might even consider buying this twice in a row! ;-)


That's all for now! Do you have any favorite body/beauty products I should try??


Wednesday, June 19, 2013

Iced coffee!

One of the highlights of my day (yes, sad but true), is enjoying a nice iced coffee! When it starts warming up here, I pack away my coffee maker and go into ICED COFFEE MODE! 
I used to brew my iced coffee double strong and keep it in a pitcher in the fridge. But then, my friend Samantha, told me about a wonderful iced coffee recipe from the Pioneer Woman....found here. It's great, super easy and I only have to make it about once a week.

Follow the link above for the step by step directions, but basically, you pour half a bag of coffee grounds in a big bowl, fill it with water, cover it and let it sit over night. Then pour the coffee through cheese cloth and a strainer (I use a mesh one) into whatever pitcher you want to use to dispense your coffee. 
Keep in the fridge and help yourself whenever! I used flavored creamer so I don't have to add additional sugar (which doesn't dissolve well in cold drinks anyway).

Here's my set up in the fridge...

Yum....makes me want some right now! 

Wednesday, June 12, 2013

Go Greek!

So I get these random recipe postcards in the mail every couple months. They are addressed to the previous owner of our home, and they come from a car dealership. I have no idea why a car dealership sends recipes, but I like to take a peek and check out the recipes. This one, for Grilled Greek Marinated Pitas, caught my attention, since Greek is one of our favorite cuisines!
This is really yummy, restaurant quality, in my opinion!

I thought I'd share it for a couple reasons...1) I think you'd love this recipe and 2) I'm afraid I'll lose the postcard and the recipe will be lost forever...now it will be documented!


This picture is from the post card.
 I kept eating my pita before I could get a picture. ;-)

Now, the first part is for the marinade..don't be afraid, it involves a blender (you can use a hand/immersion blender too). I say "don't be afraid" because I tend to avoid any recipe that requires small appliances...the simpler the better. But this is really not difficult, so give it a shot!
You could also make the marinade on it's own for a yummy Greek dressing, it's very tasty.

Marinade:
1/4 c fresh lemon juice
1/4 c white vinegar
2 tsp sugar
1/2 tsp salt
1/2 tsp season salt
1/2 tsp red pepper flakes
1/4 tsp pepper
3/4 tsp Italian seasoning
1/4 tsp dry oregano
4 cloves garlic peeled
1 cup canola oil
1/2 cup feta cheese

Marinade: In a blender, combine all ingredients except the canola oil and the feta. Blend until smooth. While the blender is running, add the oil in a steady stream. Add the feta and pulse the blender a few times just to blend.

Pitas:
2 boneless chicken breasts
hummus
feta cheese
cucumber, chopped
tomatoes, diced
red onion, thinly sliced
pita bread

Pitas:
Marinade the chicken in the 3/4 cup of the marinade for at least 2 hours. Grill and then cut into slices. Spread inside of the pitas with hummus. Fill pitas with grilled chicken, cucumber, tomatoes and red onion. Drizzle the remaining marinade (that you did not use for the chicken) on top of each pita. Sprinkle with Feta cheese!

Monday, June 10, 2013

Easy Pita Chips

I recently found fresh pitas at the $.99 Only Store (you never know what you will find there!). I didn't end up using them all as quickly as I had anticipated, so I ended up with a very serious situation on my hands...some pitas about to expire. ;)
Around the same time my pitas were starting to get crusty, I bought a giant tub of hummus at Costco (on sale too!). 
Once I got home, I realized I would need more than veggies to successfully eat all the hummus, which gave me an idea.......To turn my pitas into pita chips! I know, I know, serious epiphanies happening in my kitchen.
(and yes, I had to look up how to spell epiphany)

I followed this recipe loosely, if you want measurements and fancy things like that. ;-)

Here's what I did.
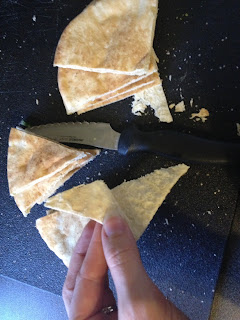
First, I cut my pitas into small triangles. Then I peeled them apart so that they'd be a single layer. 


I heated the oven to 350 degrees. Then I mixed olive oil with a dash of salt, pepper, garlic powder and italian seasoning. I tossed the pita chips in the olive oil then put them on a baking sheet. 

I brushed any dry spots with the remaining olive oil. (in hindsight, I think I put a little too much olive oil on them. So you may want to choose to "just toss" or "just brush").
I sprinkled one batch with kosher salt...which was very tasty!
The result was crunchy, yummy chips. Enjoy!


Friday, June 7, 2013

DIY Pillow Covers

My husband has never been fond of the throw pillows I bought for our couch years ago. So since they've been getting kind of dingy (they do not have removable covers, thus never been washed...ewwww), I figured it was time to give in to Matt and look for new throw pillows. ;-)
I found some really cute ones at HomeGoods recently but I wanted more than two. I had a couple old throw pillows with ugly covers hidden away in one of those vacuum storage bags. So I pulled them out and removed the covers...and surprise! They were actually pretty nice feather pillow underneath. 
Here are the pillows with no covers on them...

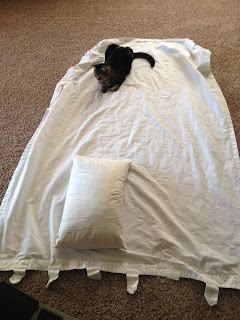
I had material from old white curtains (Ikea, hem-your-own ones), so I decided this would be the most budget-friendly way of making new pillow covers. I followed this tutorial  from my dear friend, Katie's AMAZING blog! See her step by step instructions for these pillow covers (her fabric is super cute...and I don't have to type out the instructions...win-win!).
Here are the curtains before I cut them up (notice my little kitty helper, Miles).

I was able to finish the first one during Evelyn's nap and the second one during an episode of 30 Rock...see, these truly ARE simple to make!
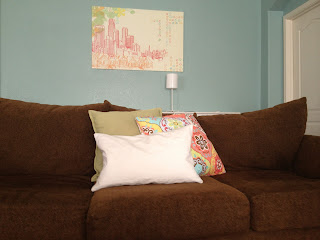
Here are some pictures of the finished product!
Okay, so not the most flashy pillows ever, but I needed 
something neutral, inexpensive and easy to wash.

Set of three for the couch

Set of two for the chair and a half

Monday, June 3, 2013

Reusable Fruit Pouch

Evelyn LOVES those fruit pouches (applesauce, berry, etc.) that you can buy at the store. Whoever invented these must be laughing all the way to the bank--they're filled with about $.05 worth of applesauce and are sold for like $.88 (at least!). Seriously though, why didn't I think of this?!
Evelyn sucks them down in about 2.3 seconds and is always left wanting more.

I've been meaning to purchase some reusable/refillable fruit pouches because Evvy devours them and I'm tired of wasting my money on them!
Debating between these options: Any suggestions??


Anyway, in the meantime, my husband came up with such a genius idea while I was out for a girls' night!

He simply snipped the bottom off one of the fruit pouches, filled it with our own applesauce, clamped it with an Ikea chip clip and...voila! Evelyn loves it just the same and we just keep refilling it for her. So awesome!


I've done a number of different combinations..applesauce/banana/oatmeal; applesauce/strawberry/blueberry; applesauce/banana/sweet potato/carrot...you get the picture. :-)
Evelyn loves them and it's a great way for her to eat some things she wouldn't normally eat!
I'm still planning on purchasing some real reusable pouches, and definitely bigger than 4oz! But for now, this is working while I choose which ones to buy. 


Evvy enjoying her homemade refillable fruit pouch!


Sandbox!

I really really wanted to build a sandbox for Evelyn.
I had dreams of pinterest creations...similar to these...


But alas, all of these take time and money. And with Matt's growing list of projects to complete, I decided to take matters into my own hands and go on a quest to make the cheapest, easiest sandbox around!

First task was to think of something I could easily cover (to keep out bugs, dirt, rain, and most of all lurking neighborhood cats). I decided on using a large, shallow rubbermaid container (one intended for under-the-bed storage). 
Then I was on a search for sand. I really wanted white sand, but apparently that can only be special ordered. And considering I wanted instant gratification (and something budget friendly), I opted for regular/natural colored sand. I found 50 lb. bags for less than $5 at Home Depot! (I bought two bags, although I only needed one to fill the bin. But I'm expecting quite a bit of "loss", so I'll probably need it for refill)
I had Matt prop the sand box up on extra stone stepping tiles we had so it would be at Evelyn's waist height.

I only bought one sand toy (wheel spinny thing) for $2.99 at Target, all the other toys, we had at home. (kitchen utensils work great too!)
Since I had the rubbermaid bin at home, I really only paid for the sand. Score! 
This has definitely been a favorite outdoor activity. :-)


Like mother, like daughter?

Well, decide for yourself, but Matt and I think that Evelyn has some similarities to myself as a baby. The hairline, cheeks, lips and nose particularly. :-) Both of these pictures were taken around 1 year of age. I'm on the left, Evelyn on the right. I love that we can see different parts of both Matt and me in her. Definitely a strange feeling to see someone that has your DNA. We love this little girl!